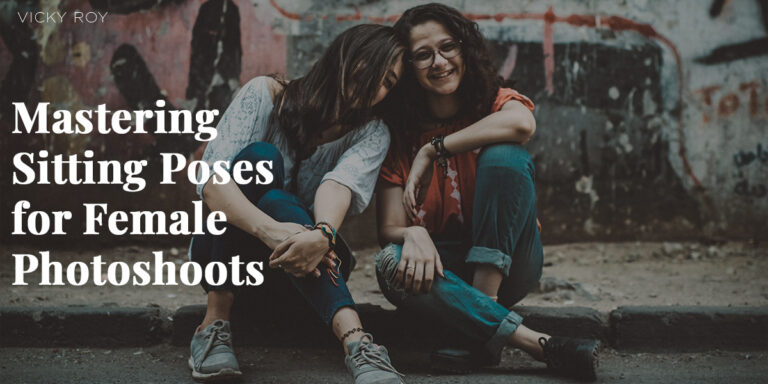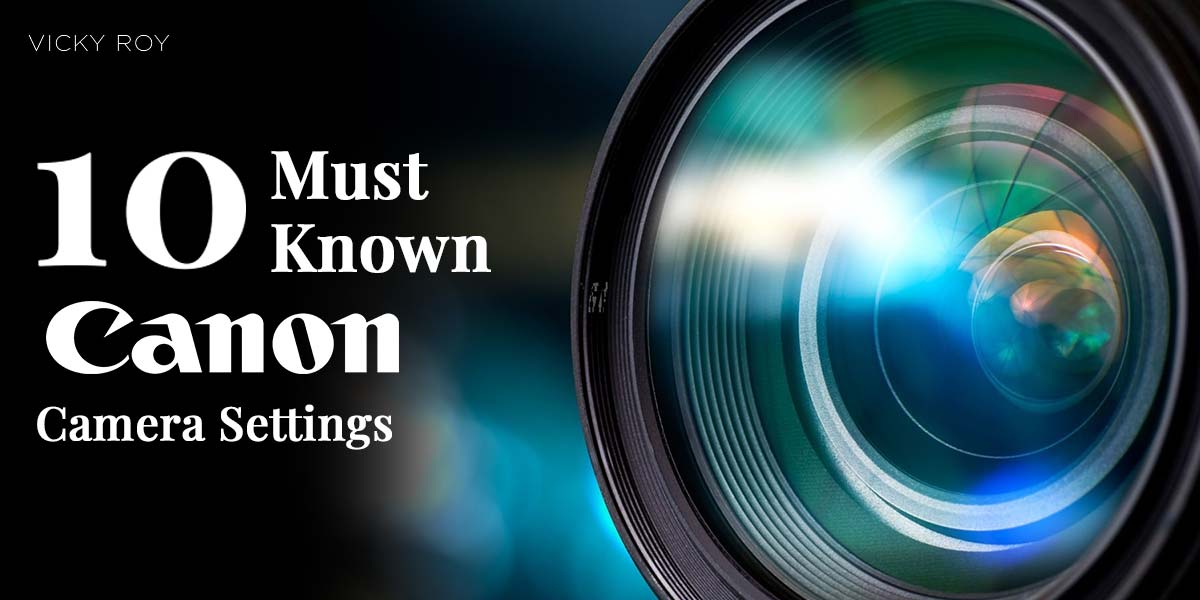
10 Must Know Canon Camera Settings
Photography has always been a striking form of art. Seeing a scene that deserves to be captured, a moment frozen for centuries to come, the indescribable beauty of something held still. Be it a scenic view, nature, or a fellow human, capturing an image as it is for all to see or just your eyes alone would forever remain to be an element in the life of humans.
Aren’t we looking to cement ourselves into everything we do?
And what better way to do so than photograph the moment? Preserved beyond the confines of human life.
That being said, figuring out the camera settings is a major first step that one needs to tackle before getting to the lyrical part of the poem. It is the fundamental knowledge that can elevate your photography skills.
While it may seem tricky at first look, figuring out the camera settings in a Canon camera might not be as difficult as you think it is. We’ve compiled a list of the 10 Must Know Canon Camera Settings that are sure to help!
10 Important Canon Camera Settings
1. Canon Aperture (Av) Settings

One of the basic and key settings that every camera user must master is the aperture settings. Aperture refers to the distance light travels through the lens before hitting the sensor while the shutter is open. The f/stop is the unit of measurement for apertures.
Since f/stops are fractions, an f/4 lens has a diameter of 1/4. Because f/8 (1/8) is a smaller lens opening size than f/4, less light can enter the camera at that setting.
The foreground, middle ground, and backdrop all contribute to the “depth” of your image. How “in focus” (or “depth of field”) each of those components is is what we mean when we talk about depth of field.
When using a large aperture, such as f/2.8, the depth of field is almost nonexistent. Photographers that specialise in portraiture typically use a shallow depth of focus to get the desired effect of a blurred background.
Photographers that specialise in landscapes typically aim to have the majority of the picture in sharp focus. Sharpness is improved from front to back by using tiny apertures (f/16 or smaller).
A wide aperture, from the maximum opening of your lens like f/2.8 down to f/5.6, is what you want if you want to have a small piece of the scene in focus while blurring some areas of the image or if you’re shooting in low light. Portraiture and night photography are two good examples of this type.
2. Canon Camera Modes Settings
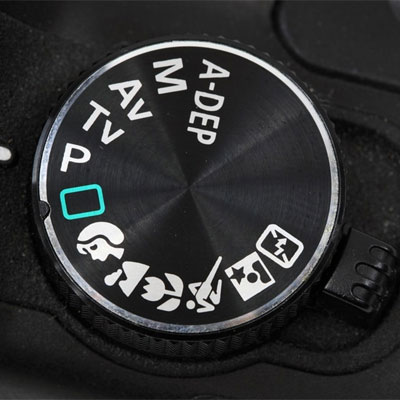
When it comes to shooting, Canon cameras offer a variety of “mode” options. Currently, Canon cameras offer a wide variety of shooting modes, including completely automatic, semi-automatic, and manual.
Common to most cameras are a variety of shooting settings. Which one you use depends on your personal taste, research interests, and level of expertise. The semi-automatic modes of a camera, such as Aperture Priority (Av) and Shutter Priority (Tv), allow you to tailor the camera’s exposure to the topic at hand.
Photograph showing the “Basic” option on a Canon camera’s mode dial.
The green square on the mode dial indicates that the camera will automatically adjust the settings for you. All you gotta do is aim and click. By switching to Programme (P) mode, you can adjust your camera’s shutter speed, aperture, ISO, metering method, and white balance.
In Aperture Priority (Av), the shutter speed is controlled by the camera, while the aperture is controlled by the photographer.
In Shutter Priority (Tv), the shutter speed is set by the photographer and the camera determines the aperture.
In manual mode (M), you’ll have full control over the camera’s exposure parameters. In most cases, a newbie can get by without consulting the handbook at all.
3. Canon ISO Settings
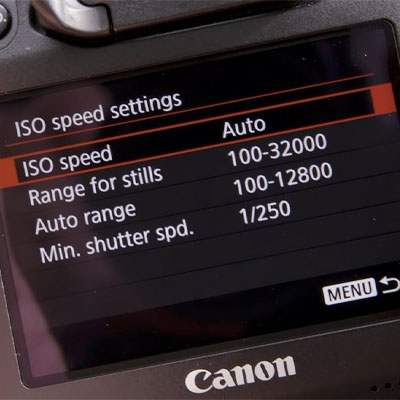
ISO is a crucial setting on Canon cameras. The ISO setting determines how sensitive your camera’s sensor is to light. ISO, the third and final component of the exposure triangle, is frequently rated as the most difficult for inexperienced photographers.
A higher ISO makes a camera more sensitive, whereas a lower ISO makes it less sensitive. There’s a lot to consider when setting ISO, but for now, know that lower ISO numbers (often 100-400) result in better image quality.
Digital ‘noise’ in images is minimized when shooting at a low ISO. The optimal ISO value for a camera is determined by a number of factors, including sensor size and intended purpose.
When photographing in bright light, use a low ISO setting. Low ISOs have values between 100 and 400.
However, when shooting in low light or increasing the shutter speed, you’ll most likely need to use a high ISO setting between ISO 800 and ISO 6400. Determine the highest ISO setting on your camera accordingly. ISO 3200 is a good starting point for inexpensive cameras, whereas ISO 6400 is appropriate for professional equipment.
| Scenario | Recommended ISO Setting |
| Bright Day | 100 |
| Cloudy Day | 400 |
| Dusk and Dawn | 800 |
| Indoors (no flash) | 1600 |
| Night | 3200 or 6400 |
4. Canon Exposure Compensation Setting
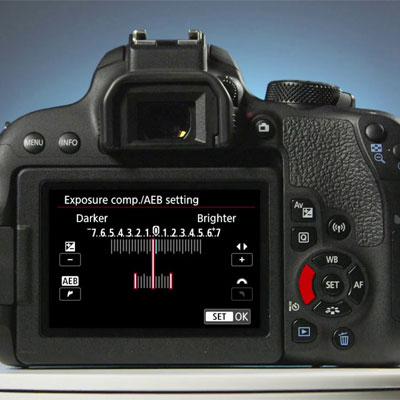
The camera metering modes are likewise linked to the exposure compensation dial/button. You can use this feature to change the light metering setting in your camera, letting it know whether you want an overexposed or underexposed photograph.
When using any of the camera’s automatic or semiautomatic modes, you can change this camera setting. It’s an excellent technique to improve your camera in low-light circumstances, especially when there’s a lot of contrast, such as in a snowy landscape.
It’s also useful for capturing a scenario in accordance with your artistic vision. Change the exposure compensation by pressing a little button alongside either of the front/rear dials or by pressing the specific exposure compensation dial if your camera has one.
5. Pop-up Flash Setting
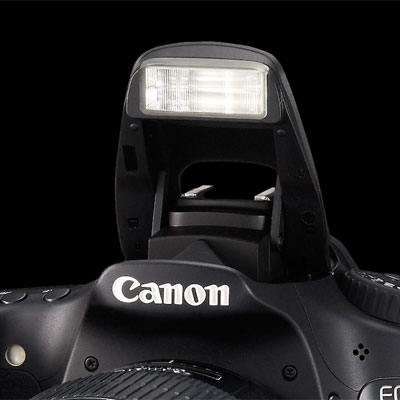
A widely-hailed setting in the Canon camera is its pop-up flash setting! This setting on the Canon camera is one of the core options, and it’s very easy to utilize. Simply take a picture by pressing the button that activates the flash.
Using the flash exposure compensation setting in the main control panel to modify the power of your flash if you find that it is either too powerful or not powerful enough.
6. Metering Modes Settings
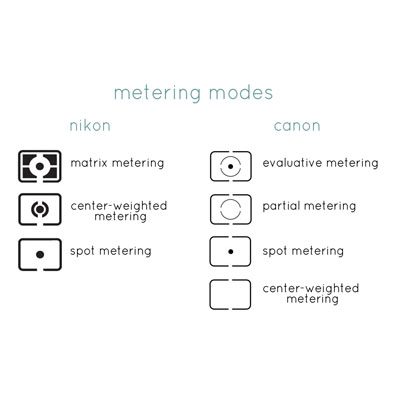
The Canon camera allows the photographer to vary the way the camera reads the light in the scene by switching between different metering modes, which will affect the exposure as a whole. In a nutshell, the metering modes of the camera determine how the light within the scene is measured.
This is accomplished with digital cameras by using the exposure meter that is incorporated into the body of the camera.
Spot Metering and Partial Metering
The light reading for spot metering is taken from approximately 2-4 percent of the frame, while the reading for partial metering is taken from a larger, more forgiving area that is approximately 10 percent of the frame.
If your subject is light from behind, or if you want to expose a specific section of the subject, partial or spot metering is both excellent choices. Spot metering is especially useful for nighttime photography.
Center-weighted average
When using a center-weighted metering method, the light is measured primarily in the middle of the frame, with less emphasis placed on the outer edges. When utilizing neutral density (ND) filters, which might cause evaluative metering to overexpose a photograph, this feature comes in handy.
Evaluative
This ‘intelligent’ metering mode reads light from all sections of the frame, and then calculates an average exposure based on the bright and dark areas of the picture, with a bias towards the specified AF point(s). The majority of lighting conditions can be successfully captured with the assistance of evaluative metering.
7. Canon Focusing Modes Settings
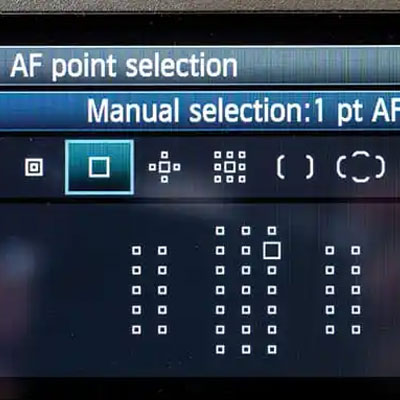
Modifying the camera’s focus settings is a fundamental step toward capturing crisper photographs.
These camera options can be roughly classified as either Manual focus mode (M) or Autofocus mode (AF), depending on the photographer’s intended use. After pressing the focus button, some cameras immediately lock focus, while others continue to fine-tune it.
The camera can be set to one of two primary focus modes:
When set to Single Autofocus Mode (AF-S/One-shot AF), the camera will lock focus on the subject but will not refocus if the subject moves. It’s ideal for taking photos of static things and is also a good choice for landscapes.
After focusing, if the subject moves within the frame, the camera will attempt to follow it using the Continuous Autofocus Mode (AF-C/AI-Servo). When taking pictures of wildlife, sports, or even just walking down the street, this is the best setting mode to use.
8. Canon Image Quality Settings

The Canon camera can be set to capture images in RAW format, processed jpg format, or both, and at a variety of resolutions.
The Canon camera’s default settings favour JPEGs. In-camera processing of JPEG files is possible. It’s as simple as uploading the photos from your memory card, having them printed, and then sharing them online.
JPEGs are convenient because they are already processed and don’t take up much room on your memory cards or hard discs. Unfortunately, they have minimal information about colour tones.
If you want to play around with post-processing your images on a computer, RAW shooting is the best option. With software, your customization options are practically limitless. You’ll eventually be able to take images in raw format as your skills improve. Raw files are larger than JPEGs, but they offer more editing options. Colour, exposure, and white balance can be modified more easily than with JPEGs. If you want to edit your images in a programme like Photoshop or Lightroom, you should shoot in Raw.
9. Shutter Speed Setting
The shutter speed of the canon camera is another essential camera option that is related to the other key exposure controls. By adjusting the shutter speed, you can either capture subjects in mid-motion or completely stop their forward momentum for a more artistic effect.
Choosing the appropriate shutter speed for an action shot can open up a wide range of aesthetic options. The shutter speed of a camera determines how long the shutter remains open and light may enter the camera. Shutter speed is a crucial exposure control because of the two major effects it has on motion and camera shake.
Seconds and fractions of seconds are used to describe shutter speeds. A slower shutter speed, often between 1/60th of a second and several minutes, should be used while shooting in poor light, such as at night, or when attempting to capture motion, as in long exposure photography.
The standard time restriction for this photography mode is 30 seconds; to extend it, you’ll need to switch to Bulb mode and employ a shutter release. In terms of shutter speed, I find that 15-25 seconds works best for me while photographing the Milky Way.
When you want to capture a moment in time that hasn’t changed, though, choose a fast shutter speed, preferably between 1/60th and the camera’s minimum shutter speed setting, which is typically 1/4000th of a second. Photos of animals in motion or athletes in movement are excellent examples of this type of photography.
The shutter speed dial can be found on the top right of most cameras, either on the front or back of the device.
10. Focal Length Adjustments
The camera body and a standard zoom lens are typically supplied together as a package. The usual range of a kit lens is 18–55mm, making it versatile enough for a variety of uses.
The term “focal length” is used to describe the extent of the viewable area. The lower the number, the wider the field of view (18mm), and the higher the number, the more ‘zoomed in’ the view (55mm).
The landscape is perfect for the 18mm lens. When it comes to versatility, 35mm is hard to beat. The 55mm focal length is ideal for close-up shots and portraiture. The depth of field is also affected by the focal length, with shallower depth of field and a less sharp background with longer focal lengths.
Settings for Landscapes
If you have access to a tripod, use it. Sunrise and sunset are the ideal times of day for photography. Aperture Priority (Av) mode should be selected first, using f/16 aperture and ISO 100 sensitivity settings.
Next, set your lens to manual focus and zoom out to 18mm for the widest possible perspective. Now you may arrange your shot using Live View on the LCD screen. When you’re satisfied with the composition, zoom in to a spot that’s about a third of the way into the scene, and focus manually there. Finally, set the self-timer and press the shutter button to take a clear picture.
Settings for Panning Shots
The first step is to determine your distance from the topic and then adjust your lens to either 35mm or 55mm. Follow this by setting the shutter speed in Shutter Priority (Tv) mode, using the table below as a guide.
Now, with the central focus points active and the ISO set to either 100 or 400, take some shots using AI Servo AF (continuous AF). Half-press the shutter button and follow your subject as they get closer. Last but not least, as they go by, maintain a steady turn of the hips to follow them as you hit the shutter button completely.
| Walking | 1/8 to 1/15 sec |
| Running | 1/15 to 1/30 sec |
| Cycling | 1/15 to 1/60 sec |
| Cars | 1/30 to 1/125 sec |
| Racing | 1/125 to 1/250 sec |
Settings for Portraits
Find a spot that is free of distractions for a few metres behind your subject. Then, depending on the lighting conditions, set the ISO to 100 or 400 and the aperture to f/5.6 in Aperture Priority (Av) mode.
Reduce the focal length to 55mm. Next, make sure only one AF point is active and switch to Single Shot focus mode. Finally, while looking through the viewfinder, move the AF point to where it will be over the closest eye of your subject. You may now proceed with shooting.
Conclusion
The optimal camera settings are determined by the type of photography you perform and the conditions under which you shoot. There is no one-size-fits-all solution because each case may necessitate a different set of parameters to obtain the desired result.
- Choose the proper aperture for the depth of field you want.
- Use a shutter speed sufficient for the amount of motion you wish to freeze or capture.
- To avoid overexposure or underexposure, adjust the ISO according to the lighting circumstances.
- To ensure realistic colour representation, use the appropriate white balance setting.
- Consider shooting in RAW format for increased post-processing options.
Experiment with different camera settings to discover the right combination that produces the desired result. It’s also a good idea to practise on a regular basis to gain experience and build your own distinctive style.